The initial intent of this section is not a complete treatment of the art of photography. There are many classes and books on the subject with a platform more suited to detailed instruction. My desire is to provide a clear understanding of the fundamentals of photography and an appreciation for the nearly boundless possibilities of the art while presenting some tools and methods I've found particularly useful. Hopefully, as the content grows, it will prove to be beneficial to both new and advanced photographers. Any skill can benefit from a review of the fundamentals from time to time. This section is organic and constantly growing as time permits, so stop by occasionally to see what's new.
From the wisdom of the great depression era photographer, Dorothea Lange, "The camera is an instrument that teaches people how to see without a camera.”

Billy Johnson
Photographer
One of the great challenges and creative pleasures in photography is that of forming a clear and concise vision of the image we seek. Anyone can take a "snap shot" and will most certainly "get lucky" sometimes. But the capture of a meaningful image and more consistent results will typically require a bit more effort. We sometimes feel moved by a photograph without realizing why it evokes a particular emotional response. But the photographer probably applied some skill to elicit that very response when the image was captured.
When a subject of interest is discovered, don't be so eager to bring up the camera unless, of course, the subject is a fleeting moment. When possible, a shoot should be preceded by a little forethought as we choose our location and position ourselves to take the best advantage of light and perspective. Given that, the question becomes, "What part of the scene before me evokes an emotional response?". The image with impact is hidden there. Everything that can be eliminated from the shot that does not enhance that emotional response will increase the impact of the photograph. I could repeat that a thousand times! Be vigilant, and you will be rewarded. Now, when you look through the lens, are you feeling it? When you have the composition in the frame, look carefully at the edges to spot anything which might be intruding into your carefully selected view. If necessary, adjust the composition to eliminate such distractions.
As the poet Robert Browning once wrote in "Andrea del Sarto", "...less is more...".
It's all about the light. You've probably heard this a lot, but what does it really mean? We and our cameras never actually see our subject directly. We observe the light and interpret the scene through filters of the eye or camera. The human eye and the camera do not interpret light in the same way. We need to understand those differences and learn to exploit them in order to convey the most powerful image. That process begins before the camera is brought into play. We're already "working the light". Is there a better perspective to catch the reflected or refracted light? Should we wait for the warmer light of early morning or nearer to sunset? This is not "over thinking it". We are learning to "read the light". With time and repetition, this process becomes second nature, happening quickly. But early on it requires a measure of intent.
Many new photographers are easily overwhelmed by all the "bells and whistles" of even the least expensive current digital camera. Don't fall into that trap! I suggest that, for the moment, you put the camera and its manual aside. In the beginning there are only a few aspects of the camera and lens worth considering. The nuances come later. Success in any endeavor is built on solid fundamentals. And the fundamental of photography is the manipulation of light. But just as the infinite possibilities in music are born from a few notes, the power of photography is unlocked through the combinations of those few controls we can exert on light. Those controls are simpler than you might image, but the result of the combinations seems virtually limitless. As with the musical instrument, time and practice will bring a familiarity that lends a transparency to the camera. In time it will require very little thought. Avoid the "techno-mania" which drives so many photographers to constantly "upgrading" their equipment. Freud would probably have something to say about that. Be certain that you've actually outgrown the tools you have before sacrificing that hard earned transparency. There should be significant gain for the pain. But if you are sure you've hit a wall with the equipment you have, don't hesitate. Move up.
As I mentioned earlier, the fundamental controls we have over light in photography are quite limited when considered individually. The power lies in the combination of those controls. This brings us to a discussion of SHUTTER SPEED, APERTURE and ISO, often referred to as "the exposure triangle" of photography. We'll discuss them individually and then explore some combinations of these controls. But there is one VERY important thing they all have in common. One "full" adjustment step of each setting will halve or double the light the camera sees. We call that step a "stop" for reasons that will become apparent later. Just remember that a "stop" is one "full" step of the given control. I stress "full" stops because modern cameras offer fractional increments as well. Each control will have the same effect on "exposure" of the sensor or film to the incoming light. And each of them also have an additional super power!
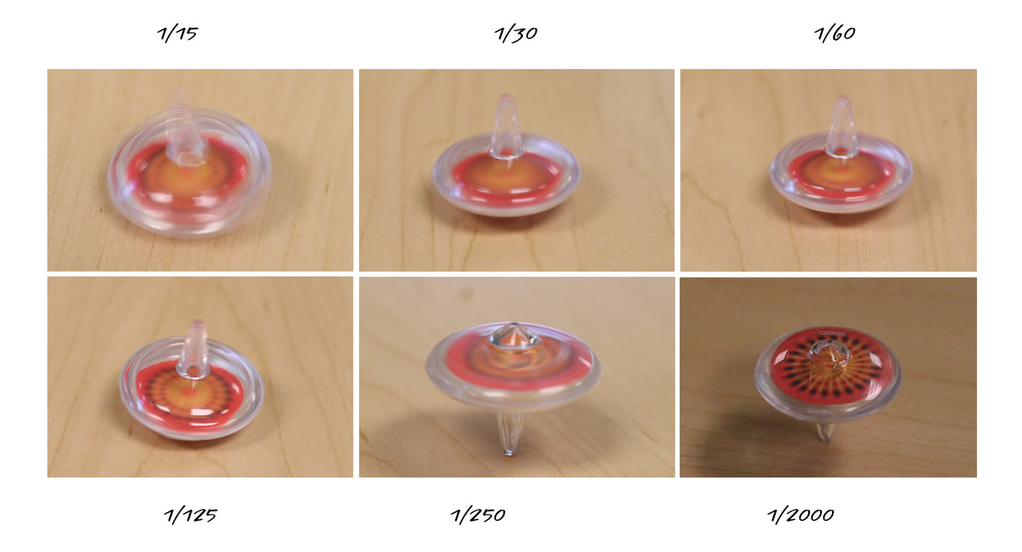
SHUTTER SPEED or exposure time (T) is the length of time that the film or digital sensor inside the camera is exposed to light (the camera shutter is open) when taking a photograph. The amount of light that reaches the film or image sensor is proportional to the exposure time. A shutter speed of 1⁄2 of a second will let half as much light in as 1 second, and so on. Remember that when choosing shutter speed, one full "stop" will either halve or double the amount of light. This adjustment has a dramatic effect on motion blur in the image as well as the exposure level (lightness or darkness).
As illustrated in the image below, a "slow" shutter speed such as 1 second will increase motion blur, while "faster" shutter speeds such as 1/2 second will decrease motion blur. A "fast" speed such as 1/400 second would tend to freeze the motion.
The image below demonstrates how each "stop" will change the exposure (make the image darker or lighter) by either halving or doubling the light that reaches the film or sensor.
APERTURE is represented by the "f-stop", which is simply the focal length of the lens divided by the chosen "internal" diameter of the lens. It will be indicated by "stops" such as "f1.2, f8 or f16". As stated before, each stop also halves or doubles the light allowed to reach the film or sensor.
But APERTURE also has a super power called "depth of field". "Depth of field" is simply what will be in focus within the image from the nearest to the most distant object. A smaller f-stop allows more light, but decreases the depth of field. Conversely, a larger f-stop allows less light and increases the depth of field. This setting massively expands the creative capacity by allowing us control over the depth of field of the image as well. It's important to note and remember that the "point of focus" we choose is NOT centered within the "depth of field" selected by the f-stop. In fact, about 1/4 of the "depth of field" exists in front of the "point of focus", while about 3/4 of that "depth of field" is behind the "point of focus".
I nearly always begin with the "f-stop" setting to establish the desired "depth of field" and adjust all other settings relative to that. Depth of field sets the tone for the image I'm seeking. For example, in a portrait I would choose to put the background out of focus by "opening" the lens with a very small f-stop (LARGE APERTURE) such as f1.4 or f2.0. But if I'm shooting a landscape image with a flower in front of me and mountains beyond and want all of it in focus, then I would "stop" the lens down to a very SMALL APERTURE such as f16 or f22 and beyond. For the moment, just remember that the larger the f-stop number, the greater the depth of field. And the smaller the f-stop number, the smaller the depth of field. F-stop is not an absolute, but rather a ratio of lens focal length divided by the diameter of the opening we selected.
The image below demonstrates the changes in "internal" lens diameter as we move through the "f-stops".
The image below demonstrates the changes in "depth of field" as we move through the "f-stops"
There is a VERY important point to understand about depth of field and focus. The point of focus is NOT centered in the depth of field selected. About 1/4 of the depth of field occurs in front of the point of focus, the remainder is behind it. Watch those foregrounds for focus!
ISO (International Standards Organization) refers to the sensitivity of the sensor or the film we have selected. Again, one step is one "stop" and either halves or doubles the "sensitivity" to the light available to the sensor or film. And it's called "ISO", not "I-S-O". The numbers are the same for both film and digital sensors such as 100 ISO, 200 ISO, 400 ISO, etc. The lower ISO produces less noise or grain in the image, but requires more light. And the higher ISO produces more noise or grain and requires less light. The higher ISO values are not all about speed! Sometimes we prefer the higher ISO for the image characteristics it produces due to that noise or graininess. That is the super power of ISO. As with SHUTTER SPEED and APERTURE, it is all in how the photographer chooses to use it to get the desired image.
The following image in a graphic example of ISO changes in action.
If you haven't already, now would be a good time to pull out your manual to find where the camera controls for shutter speed, aperture and ISO are located. Familiarize yourself with these settings. They are the building blocks upon which all your photographic efforts will rest. Play with them. Experiment. Take some shots and look at the results until you can see how each setting contributes to the image. Trust me, if you keep shooting you will eventually make these choices with very little thought. That familiarity with the camera leads to a transparency, just as with a musical instrument, that is your entry into a world of enjoyable photographic creativity.
History is a great teacher. To develop an "intuitive" feel for what a composition and combination of camera settings will render in the image, critically examine your existing work. Be your own best critic. Remain objective while sorting images after a shoot. When you really like some shots, ask yourself why and look for a detailed answer. The answer should sound something like, "I got the foreground focus just right and added enough depth of field. The focus is sharp where it's suppose to be. I didn't 'blow out' the highlights." You get the idea. This will reinforce what you're getting right. Also, one should always look to the work of those they admire when seeking inspiration. First, one should always just relax and enjoy the art, but then look again with technique in mind. What excites you about the image, and how did the photographer get that result? This is the same process you should be employing with your own work.
And then there's the trash. Not all of our shots are "keepers". But these are equally as important as the best shots to your growth as a photographer. Avoid getting caught up in too much detail with this "review" process in the early stages of your photography. Start by by looking for patterns such as "I seem to blow out the highlights a lot", which is a common mistake even for well seasoned photographers. This will provide the greatest progress in the least amount of time. You will begin to apply techniques we'll discuss later to avoid, or at least minimize, the occurrence of these problems. This feedback loop is critical to your growth as a photographer.
When you've learned what you can from the mistakes, throw out the trash. Be honest here. If the image is really not redeemable, get rid of it, or you will find yourself living in a rubbish pile of bad images. Seriously. This is the time for some objective detachment. Those images are not your children. If you think you might learn something later to help salvage a shot or it has some sentimental value, then by all means keep it. But separate these shots from the "gems" now. Otherwise, you will find yourself reexamining them again and again. And that time is better spent studying what you're doing right. As you shoot more, the need for this organization will become more apparent. We'll cover organization in more detail later. Plenty of software solutions exist to automate the task. But trust me, establish a method of organization sooner rather than later. You'll thank me for it later.
Now that we've familiarized ourselves with the three foundations of photography which are shutter speed, aperture and ISO, let's consider camera modes. Modern cameras provide several modes of control, but they are all variations on the theme we've discussed. I'll cover them briefly, but this is where you're manual would make a great resource. Serious photographers don't tend to use the modes considered "automatic", since they limit the creativity. They also don't always give the results the photographer sought.
AUTO (point and shoot) and PROGRAM are automatic modes not normally used by serious photographers since they seriously limit creativity. But the manual would be a great reference for anyone interested in them. I'll focus on creative control. I include in this category the dedicated settings for PORTRAIT, LANDSCAPE, MACRO and such. These modes attempt to automatically select settings suitable to those shooting conditions. But they lack any other creative control.
A (Aperture measured in f-stops) and T (Time the shutter stays open or Shutter Speed) priority allows one to be selected and remain fixed while the photographer moves the others for creative and exposure control. These are more commonly used. I almost exclusively choose the A (Aperture measured in f-stop) that will give me the depth of field I desire for the given shot. I then use Shutter Speed to determine the motion blur and exposure control.
M (Manual) mode allows the photographer to move T (Shutter Speed) and A (Aperture) independently to allow full creative control. Since each control consisting of Shutter Speed, Aperture and ISO have the same value for a "full stop", there are several combinations of these settings that will give the SAME exposure for the image. This allows the photographer great creative latitude.
Organization of your images should not be a monumental task, which is why it is so important to develop a good system for managing your image archive now, before it gets out of control. But there are several programs, such as Adobe Lightroom, to automate the task of image archiving. Any program you choose should have a solid tutorial to walk you through its options and use. Take the time to understand the workflow used with a given system. I prefer Lightroom since it has great image sort, edit and archive tools. It's a good benchmark in your search for the one that works best for you.
When creating an image archive, the name you give your images is far less important than the “keyword” tags assigned to them. The “keywords” allow us to find any image we want with just a few search terms. Imagine that you enter a search request such as "gray whale, magdalena bay, sunset" and out of thousands of images in the archive a handful of your best shots of that scene appear instantly in front of you. Take the time to establish a system that works for you.
If you feel that keeping the images in "folders" is important, then do so. The choices are yours. I don't bother with folders. My naming convention is quite simple and consists of the date and a sequential number I assign such as “040123_EB111”. This translates to the year of ‘04-January-23rd and image number EB111. And then I assign the all important “keywords” or “tags” such as: 2004, gray whale, sunset, Magdalena Bay, Baja, Mexico. If I had three hundred shots from this day, these “keywords” would be assigned to all of them. Then any images in that group needing more filtering would get additional "keywords". Later I can search on any of the key words to narrow my search. The “keywords” can be as specific as you would like. My archive consists of several thousand images, and I can find a particular image in a matter of moments. But always start with a system that makes sense to you, such as the order of the set I used above. There are many good books on digital asset management (DAM). The one I found most helpful was "The DAM Book: Digital Asset Management for Photographers by Peter Krogh". Design yourself a good system now and it will facilitate the image sort, edit, archive and search process. It will save you a lot of time and effort and will easily grow with your future photographic adventures.
Many amazing images have been captured with point and shoot cameras and phone cameras. They are ever present and quick. If that is all you have, learn all of its capabilities and go for it. The photographer within will tell you when it's time to move up in equipment. Good photo gear brings with it more flexibility for the photographer and great improvement on image quality which cannot be attained with inexpensive cameras and lenses. This is particularly true for lens quality. No matter how great the quality of the camera, the image comes through the lens first. I recommend the best lens you can afford that is suited to the type of shooting you enjoy. You will recognize the significance of this as you self-edit your shots and grow as a photographer.
All the major manufacturers produce equipment covering the full range from entry level to professional. I suggest choosing one of these that provides a good lens upgrade and expansion path to accommodate your growth as a photographer. If your purchase is budget limited, put your money into a single, really good lens best suited to your needs. A better camera “body” might enhance the shooting experience, but a great lens brings immediate image quality. Other lenses can be added later as the need develops.
The term "normal" simply refers to a lens that will not change the perspective we have without it and is typically 50mm or 55mm. A "wide angle" lens would be anything less than that, such as 25mm or 30mm. A "telephoto" lens would be anything greater than the "normal" lens, such as 100mm. Zoom lenses provide a range of focal lengths in one lens, such as a 24mm to 105mm zoom.
The equipment you need will be determined by the area of photography you want to pursue. Nearly all photographers find that "wide" and "normal" lenses are essential. But if you intend shooting primarily portraits, get a good 80mm or 100mm fixed focal length lens that is as “fast” (small f-stop) as possible. Wildlife shots often require “longer” (greater focal length) lenses such as 400mm or even 600mm and greater. The best zoom lenses perform extremely well, and should not be overlooked, if that would facilitate your photographic intent. Being primarily a nature and wildlife photographer, I’ve used zoom lenses extensively with excellent image quality. But if a “fixed” focal length lens of comparable quality satisfies your needs, it will typically provide an image with fewer compromises and often less cost since they are much easier to design and manufacture.
BACKUP is the first order of business! ALWAYS!! Always BACKUP anything you don't want to lose. And if it isn't "backed up", you WILL lose it some day. Also strongly consider keeping a spare BACKUP in another location. If the house burns down or thieves take all the computer equipment, how would you restore your irreplaceable images? And BACKUP frequently to avoid losing a lot of recent work. BACKUP programs simplify this task. Once you've made a BACKUP of your system or files, the program should allow you to make subsequent "incremental" backups of only what has changed since the last full backup. The program should also allow you to schedule backups so that you don't have to remember to do it.
Plenty of BACKUP programs are available and many are free. My BACKUP choice is "EaseUS". I use the pro level utility, but the free version is the same, minus some features and works very well. That is not an endorsement, only a suggestion. Pick a program that works for you, but do it now! The important thing, whether or not you're a photographer, is to have a backup system that works for you and use it to keep a current BACKUP of your files, or you WILL lose them.
Less is more. The age of digital photography brought with it a tendency for photographers, especially those new to the art, to shoot a LOT of images. Why not? They're free, right? Not really. Resist the urge. Shooting with abandon will produce a LOT more work when sorting the images. And with that comes increased worry about "throwing the baby out with the bath water". The struggle to understand why so many images don't make the cut will slow the all-important review process, and the road to photographic proficiency will be lengthened. Shoot fewer images and look more closely at the good and the bad. It's easier to do this when the digital desktop isn't piled high with images to sort. Free up all that wasted sorting time for more shooting! Reduce the guess work and the number of "keepers" will increase. If you find yourself shooting a LOT of images only to see most of them go into the digital trash, it's time to review the fundamentals. Film photographers are not immune to this tendency, but the cost of film and processing forces most to reconsider the size of the trash pile.
There are many factors which can affect image sharpness. I'll address some of those I consider most important.
Get a good tripod. For the absolute sharpest images, use a tripod when possible. Even a mono-pod can help a great deal and even double as a walking stick. A table top, fence post or wall will help. Anything you can do to stabilize the camera will translate to increased image sharpness. If the camera is not on a tripod, a rule of thumb for the slowest shutter speed (T) should be at least 1/focal-length of the lens. For example, if the lens focal length is 100mm, the slowest hand held shutter speed should be 1/125 of a second. Avoid going below 1/60 of a second without camera support. This is a guideline, not an absolute.
Use a shutter release cable for those low light conditions when possible. And if the camera is an SLR with a lifting mirror, lock it up at slow shooting speeds. Anything you can do to reduce camera shake during a shot will produce sharper images. Why spend all that money on a super sharp lens only to let camera shake rob you of the sharpness?
Smaller lens APERTURES such as f11, f16, f22 and beyond will result in much more depth of field, but there is a price to be paid in image sharpness. This is the result of light diffraction as it is squeezed through smaller openings. A very sharp lens can easily handle higher f-stops, but a lens that begins soft will yield quite soft images at those higher f-stops. Do some test shots with your lenses to determine the comfortable limit in image sharpness for your equipment.
Image "highlights" refer to the brightest part of the image, such as snow, clouds or a white shirt. A "blown highlight" is the overexposure of a bright area of the image to the extent that there is no longer detail. Unintended blown highlights are the kiss of death for an image. Most mistakes have an editing solution, but not this one. Fortunately, with a little attention, this can be avoided. I'm talking here about "unintended" blown highlights. There are situations where one might let highlights "blow out" deliberately to achieve some artistic effect. If that is the intent, go for it. But if it is not intentional, it is an image killer.
Modern camera light meters are amazing, but not fool-proof. Get to know your camera light meter and specifically how it responds to the highlights. However, we do have some options such as the histogram, blinkies, spot-metering, exposure compensation, exposure lock and filters. Let's examine these tools.
Internal camera light meters attempt to evaluate a scene and choose the best overall exposure. If the contrast from light to dark is not too great, this typically works very well. However, when the contrast of light is too great, this "evaluation" might well result in blown highlights from over exposure. Typically we would chose to lose detail in the shadows or dark part of the scene before surrendering detail in the highlights or brighter part of the image. To have shadow detail go to black is far better than lost detail in the highlights. Exposure lock is a feature most cameras have available which allows one to set the exposure based on one part of the scene, then recompose and capture the image with that 'locked' exposure. Use this feature to insure that the highlights retain detail. But there is a 'trick' I use when in a rush to get capture an image. If point of focus is not absolutely critical in the shot, shift the camera to include more of the highlight or brighter part of the image. Then hold the shutter release button half way down and hold it there while moving the camera back to the original composition. This 'locks in' the first exposure setting. When the shutter release is completed, the image is captured. This is a quick version of exposure compensation. The caveat is that focus is also locked. So be aware of that if it is likely to pose an issue.
Graduated neutral density filters are placed in front of the lens and provide varying degrees of light reduction in areas that are too bright for the sensor or film to handle. Remember that ANY filter placed in front of the lens should be of high quality or the over all image quality will suffer.